Imagerで2値化した画像にラベリングする
前回の時点で2値化まで済んでいるので、
次はラベリングを行う。
OpenCVだと、flood_fillで塗りつぶすと、
塗りつぶした範囲が取得できるので、それを使うんだけど、
Imagerの場合はそれがないので、塗りつぶした範囲の計算を行う必要がある。(*1)
ちなみに、Imagerのflood_fillはここ。
https://metacpan.org/pod/Imager::Draw#flood_fill
という訳で、さっそく2値化した画像にラベリングして、
塗りつぶした範囲の取得を行ってみる。
use v5.14;
use strict;
use warnings;
use Imager;

if ( (not @ARGV) or (not -e $ARGV[0]) ) {
    say "Usage:
    perl $0 file_path";
    exit( 0 );
}

my $img = Imager->new( file => $ARGV[0] )
    or die Imager->errstr();

my $h = $img->getheight();
my ( $ix, $iy ) = ( 0, 0 );
my $area_no = 8;
while ( $iy < $h ) {
    my $tmp = $img->getsamples( y => $iy, channels => [0] );
    my @pixels = unpack( 'C*', $tmp );

    my $found = 0;
    while ( $ix < scalar(@pixels) ) {
        if ( $pixels[$ix] == 255 ) {
            my $c = Imager::Color->new( $area_no, $area_no, $area_no );
            $img->flood_fill( x => $ix, y => $iy, color => $c );

            my $area = calc_filled_area( $img, $area_no, $ix, $iy );
            print_area_info( $area_no, $area );
            my $img_dst = crop_labeled_area( $img, $area_no, $area, 1 );
            $img_dst->write( file => sprintf("%03d.png", $area_no) );

            $area_no += 8;
            $found = 1;
            last;
        }

        $ix++;
    }

    if ( not $found ) {
        $ix = 0;
        $iy++;
    }

    if ( 255 < $area_no ) {
        die 'area_no = ', $area_no, ' too many areas! sorry.';
    }
}

sub calc_filled_area {
    my ( $img, $area_no, $filled_x, $filled_y ) = @_;

    my ( $xmin, $xmax ) = ( $filled_x, $filled_x );
    my ( $ymin, $ymax ) = ( $filled_y, $filled_y );

    my $h = $img->getheight();
    my $iy = $ymin;
    while ( $iy < $h ) {
        my $tmp = $img->getsamples( y => $iy, channels => [0] );
        my @pixels = unpack( 'C*', $tmp );

        my $found = grep { $_ == $area_no } @pixels;
        if ( $found ) {
            my $st = 0;
            $st++ while $pixels[$st] != $area_no;

            my $en = scalar(@pixels) - 1;
            $en-- while $pixels[$en] != $area_no;

            $xmin = $st if $st < $xmin;
            $xmax = $en if $xmax < $en;
        }

        if ( not $found ) {
            last;
        }
        else {
            $ymax = $iy;
            $iy++;
        }
    }

    return +{
        left   => $xmin,
        top    => $ymin,
        right  => $xmax,
        bottom => $ymax
    };
}

sub print_area_info {
    my ( $area_no, $area ) = @_;
    printf( "area_no = %3d, (x, y) = (%4d, %4d), w = %4d, h = %4d",
        $area_no,
        $area->{left},
        $area->{top},
        $area->{right} - $area->{left} + 1,
        $area->{bottom} - $area->{top} + 1 );
    print "\n";
}

sub crop_labeled_area {
    my ( $img_src, $area_no, $area, $margin ) = @_;

    my $x = $area->{left} - $margin;
    my $y = $area->{top} - $margin;
    my $w = $area->{right} - $area->{left} + 1 + ($margin * 2);
    my $h = $area->{bottom} - $area->{top} + 1 + ($margin * 2);

    my $img_tmp = $img_src->crop(
        left => $x, top => $y, width => $w, height => $h );

    my $img_dst = Imager::transform2( {
        channels => 1,
        constants => { area_no => $area_no },
        rpnexpr => 'x y getp1 !pix @pix red area_no eq 255 255 255 rgb 0 0 0 rgb ifp'
    }, $img_tmp );

    $img_dst or die $Imager::ERRSTR;
    return $img_dst;
}

$img->write( file => $0 . '.png' );
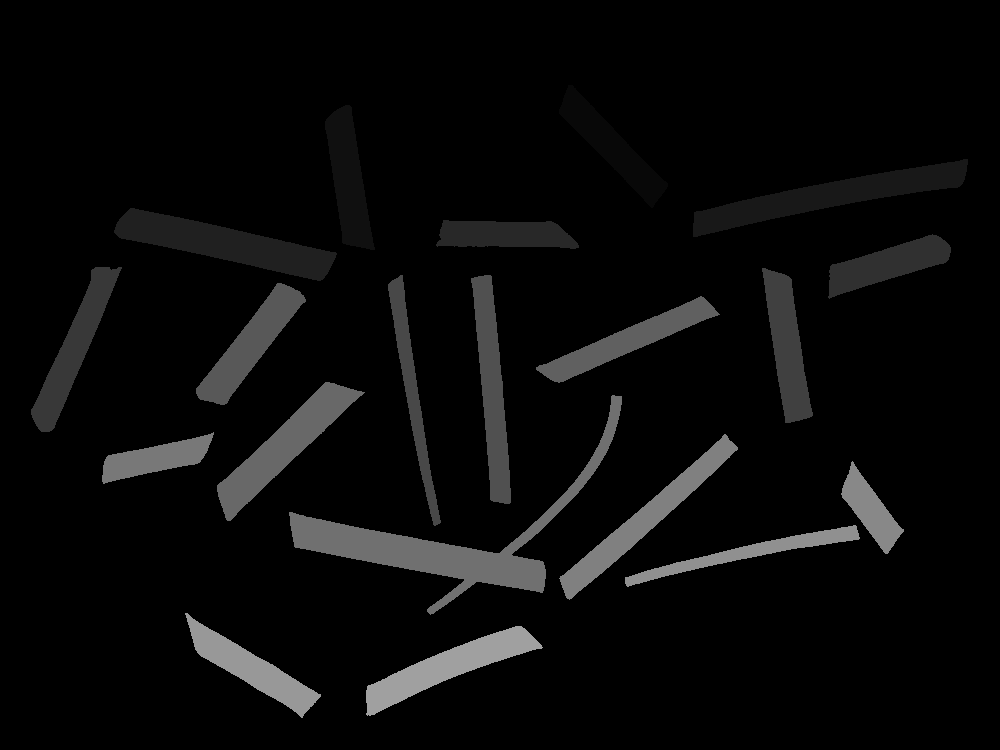
これを実行すると、こんな感じの出力が得られる。
$ perl aaa.pl 20140727-2.png

area_no =   8, (x, y) = ( 559,   85), w =  109, h =  123

area_no =  16, (x, y) = ( 325,  105), w =   50, h =  145

area_no =  24, (x, y) = ( 693,  159), w =  275, h =   78

area_no =  32, (x, y) = ( 114,  208), w =  223, h =   73

area_no =  40, (x, y) = ( 436,  220), w =  143, h =   29

area_no =  48, (x, y) = ( 828,  234), w =  123, h =   65

area_no =  56, (x, y) = (  31,  267), w =   91, h =  165

area_no =  64, (x, y) = ( 762,  268), w =   51, h =  155

area_no =  72, (x, y) = ( 388,  275), w =   53, h =  251

area_no =  80, (x, y) = ( 471,  275), w =   40, h =  229

area_no =  88, (x, y) = ( 196,  283), w =  110, h =  122

area_no =  96, (x, y) = ( 536,  296), w =  184, h =   87

area_no = 104, (x, y) = ( 217,  382), w =  148, h =  139

area_no = 112, (x, y) = ( 289,  395), w =  333, h =  220

area_no = 120, (x, y) = ( 102,  432), w =  112, h =   52

area_no = 128, (x, y) = ( 559,  434), w =  179, h =  166

area_no = 136, (x, y) = ( 841,  461), w =   63, h =   93

area_no = 144, (x, y) = ( 625,  525), w =  235, h =   62

area_no = 152, (x, y) = ( 185,  613), w =  136, h =  105

area_no = 160, (x, y) = ( 366,  626), w =  177, h =   90
ラベリングした結果画像が分かりやすいように番号を8倍してるけど、
実際は1始まりで、1ずつ増やす。
この他にも、塗りつぶし範囲で切り抜いた画像も出力されるので、
気になる人は前回の2値化画像を入力して実行すると良いと思う。
あと、List::MoreUtilsを使うと、
塗りつぶし範囲の計算がもう少し楽になると思う。
おしまい。
(*1) i_flood_fill_lowっていうのがあって、そういう情報も取得できそう・・・。
Leave a Comment