Perlでジュリア集合を描く(前編)
マンデルブロ集合の前にジュリア集合。
これは結構面倒で、
結果を見るためにいちいち計算していると時間が掛かってしまう。
そこで、色を付ける直前のデータをファイルに書き出しておいて、
色を付けるのは、そのファイルから読み込んで行えば、
少しは試行錯誤に掛かる負担が軽減される。
まずは、色を付ける直前のデータのファイル出力から。
use v5.14;
use strict;
use warnings;

use Imager;
use Time::HiRes qw/time/;

use constant KL => 5000;
use constant KS => 2000;
use constant RS => -0.3;
use constant RE => 0.3;
use constant IS => -0.3;
use constant IE => 0.3;

my $width = KS;
my $height = KS;
my $dst_file = ($0 =~ s/\.pl//r) . sprintf("_%d_%d.dat", $width, $height);

my ( $a_r, $a_i ) = ( -0.64, -0.405 );

my $dr = ( RE - RS ) / $width;
my $di = ( IE - IS ) / $height;

local $| = 1;
my $start = time();
printf( "%4d/%4d", 1, $height );
my @pixels = ();
for (my $iy=0; $iy<$height; $iy++) {

    my @buf = ();
    for (my $ix=0; $ix<$width; $ix++) {

        my $z_r = ($ix * $dr) + RS;
        my $z_i = ($iy * $di) + IS;

        my $i = -1;
        foreach ( 0..KL ) {
            my $z2_r = ($z_r * $z_r) - ($z_i * $z_i) + $a_r;
            my $z2_i = (2.0 * $z_r * $z_i) + $a_i;

            if ( 4 < (($z2_r * $z2_r) + ($z2_i * $z2_i)) ) {
                $i = $_;
                last;
            }

            ( $z_r, $z_i ) = ( $z2_r, $z2_i );
        }

        push @buf, $i;
    }

    push @pixels, \@buf;
    printf( "\r%4d/%4d", $iy + 1, $height );
}
printf( "\rcomplete! %.2fsec\n", (time() - $start) );

open( my $fh, '>', $dst_file ) or die "cannot open $dst_file : $!";
binmode( $fh );
foreach ( @pixels ) {
    print $fh pack('s*', @{$_});
}
close( $fh );
これを読み込んで色を付ける。
use v5.14;
use strict;
use warnings;

use Imager;
use Time::HiRes qw/time/;

if ( not @ARGV ) {
    say "Usage: perl $0 [dat file]";
    exit 0;
}

my $src_file = $ARGV[0];
my ( $width, $height ) = $src_file =~ /_(\d+)_(\d+)\.dat/;

say "w: " . $width;
say "h: " . $height;

my @pixels = ();
open( my $fh, '<', $src_file ) or die "cannot open $src_file : $!";
binmode( $fh );
for ( 1..$height ) {
    my $buf;
    my $result = read( $fh, $buf, ($width * 2) );
    if ( $result != ($width * 2) ) {
        close( $fh );
        die "read faild!";
    }

    my @tmp = unpack( 's*', $buf );
    push @pixels, \@tmp;
}
close( $fh );

my $img = Imager->new(
    xsize => $width, ysize => $height );
$img->box( filled => 1, color => 'black' );

my $center = 60;

local $| = 1;
my $start = time();
printf( "%4d/%4d", 1, $height );
for (my $iy=0; $iy<$height; $iy++) {

    my @rgba = map {
        my $diff = abs( $_ - $center );
        my $tmp = $diff / 32;

        my $v = int( 255 * (1.0 - ((1.0 < $tmp) ? 1.0 : ($tmp ** 2.0))) );
        ( $v, $v, $v, 255 );
    } @{$pixels[$iy]};

    $img->setscanline( y => $iy, pixels => pack('C*', @rgba) );
    printf( "\r%4d/%4d", $iy + 1, $height );
}
printf( "\rcomplete! %.2fsec\n", (time() - $start) );

$img->write( file => 'render.png' ) or die $img->errstr;
ほんとは、これを実行する前に、
色を付ける直前のデータのヒストグラムを見ている。
# ファイル読み込みを終えたところまで一緒

my %hist = ();
foreach my $buf ( @pixels ) {
    foreach ( @{$buf} ) {
        $hist{$_}++;
    }
}

printf("%4d: %5d\n", $_, $hist{$_}) for sort { $a <=> $b } keys %hist;
ヒストグラムがあると目星は付けられるけど、
その程度にしか役に立たない。
あと、Imager::Colorを使うよりは、
R, G, B, Aの順でバイト列を作って、setscanlineを呼んだ方が断然早いので、
今回はそのように実装した。
でもって、結果はこんな感じ。
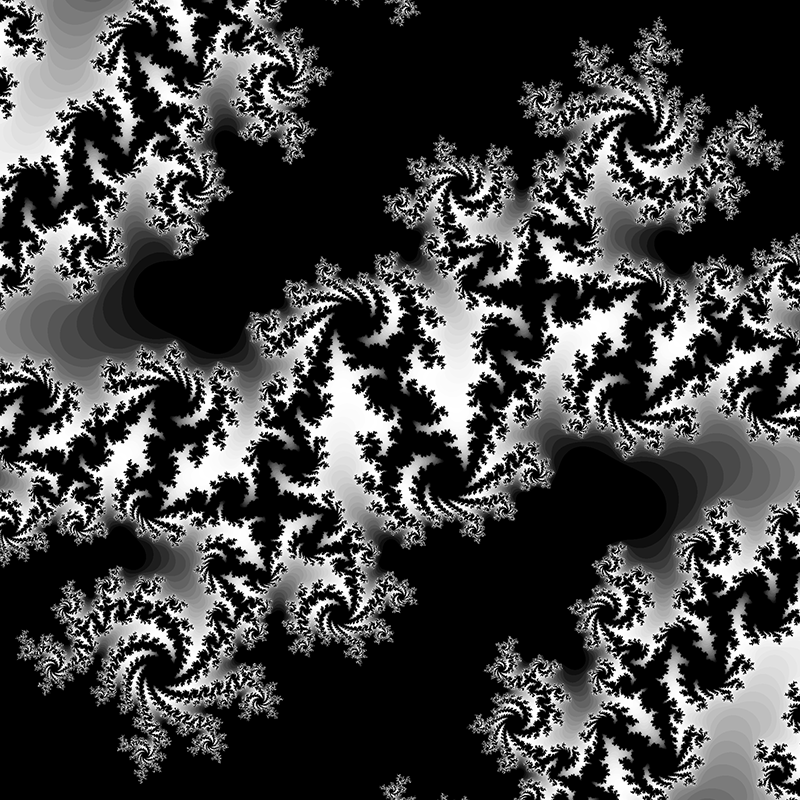
おしまい。
Leave a Comment